Designing the track plan was a multi-stip process. As I mentioned in the benchwork section, my first step was to layout a diagram for the table-top that would:
Track plan #1 started out as a point to point operation and quickly evolved into a multi-level plan with hidden staging. Trains originated in a small industrial yard, complete with turn table and round house moved around the room twice on a constant grade to end up in another industrial area below the starting point. Hidden staging was added. Two things became clear very quickly. First, the landscape dictated by the layout would be more mountainous than midwest prairie. Second, it was far too complex of a layout for me to attempt. I envisioned get partially done, getting discouraged, and then walking away from it.
Track plan #1 was drawn using a software demo program with the SAVE capabilities disabled. When I realized where the plan was going, I did a screen print and quit the program. Obviously the file was lost. The screen printout has also fallen by the wayside.
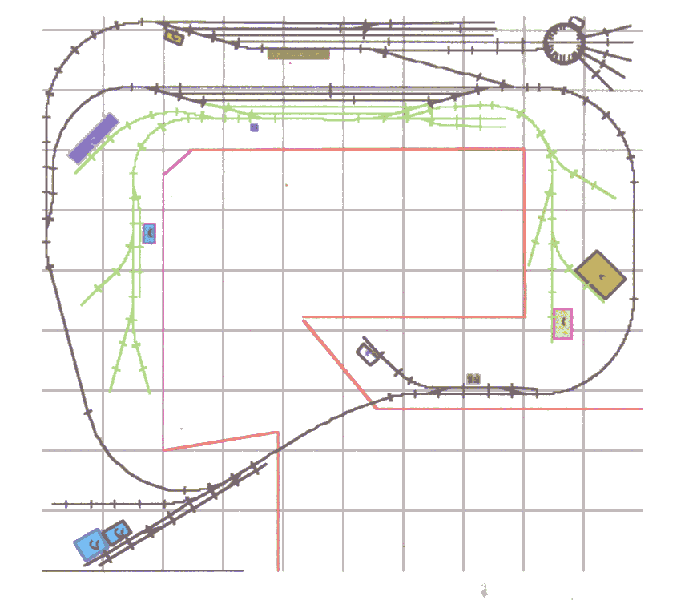
Track plan #2 provided for continuous operation on a mainline oval. A removable bridge was envisioned across the access point.. Although the mainline is draw as a single track, it could very easily be a double track, simulating heavy traffic. Two agricultural communities were served by the mainline. A small sorting yard and engine facilities were provided. It took at least one trip around the mainline from the sorting yard to reach the second yard and interchange. Track in green represented a small industrial shortline, such as the Illinois Terminal, with many different industries. One, or even two, locomotives could be busy at work on the short line / industrial spur, while two more trains could be operating on the main line. A fifth locomotive could be making up or breaking down trains in either of the yards. Ruling radius on the mainline is 19 inches. Ruling radius on the spur is 11 inches. The track plan met all of the criteria I listed above except for the scenery options. I felt that there was not enough 'open' space to allow for necessary scenery to make the layout visually interesting.
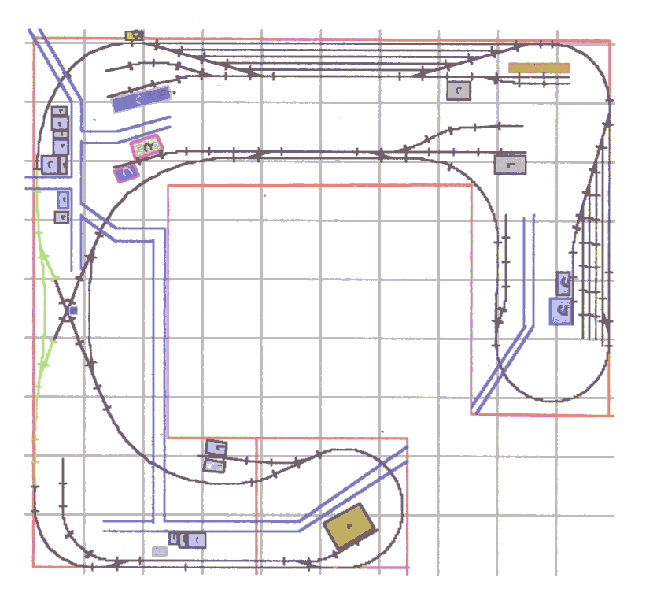
Layout #3 was inspired by the article, The Frisco in Springfield, by Patrick Hiatte (Model Railroader, Dec. 2003, pp69 - 71). The article included a track plan for a room 12.5 X 12.5, somewhat larger than my room. Also, the ruling radius on the plan was 10 inches. Track plan #3 borrows liberally from the overall design of the published layout, leaving out some elements and modifying other elements to fit into a 9 X 10 space. I sacrificed the broad curves in plan #2 and now have a ruling radius of 11 inches. All turnouts are #4. However, ample space exists for scenery, as suggested by the scenic elements included in the plan. Every rectangle on the plan represents the exact foot print of a specific model kit. Locations for roads connecting various locations on the layout are drawn in. The track plan itself should lend itself to multi-trian operation, but not with the potential flurry of activity that layout #2 had.
The layout will be wired for DCC from the outset. It will be divided into 3 power districts and a reverse loop. This reverse loop is shown in green. Each end loop of the layout is a district, while the third district is along the back wall and includes the staging yard. As mentioned before, all turnouts are #4 Atlas Custom-Line. Switch motors will be Tortoise Slow-Motion machines mounted below the table. The machines will be controlled by DPDT toggle switches mounted in a block diagram of the layout on the facia board. Red and green LEDs will show the position of each turnout.
Modular type receptacles will be mounted at strategic points around the facia to plug in the DCC hand-held throttles. Wireless throttles were briefly considered and rejected. The additional cost of the wireless throttles was not justified by the size of the layout.
As everyone knows, there are several different software packages for layout design on the market. They range from freeware programs costing nothing to full blown CAD programs costing $100 or more. Several years ago, I purchased Right Track Software from Atlas, shortly before they released it as freeware. While this is a very nice program, I have never been satisfied with the way it handles flex track. I did note, however, that Patrick Hiatte used Right Track to draw the layout design published in Model Railroader. I tried to use Right Track to draw my design, but quickly became frustrated. I downloaded demo versions of CadRail8 and XTrkCad. Both of these programs have a multitude of features, but also have relatively steep learning curves. Being the impatient person that I am, I did not want to spend days, perhaps weeks, learning to use a program, nor did I want to spend big bucks for a program that I might use only once, or that I might not really like once I learned it.
Enter Empire Express, a relatively inexpensive program that uses templates for specifice pieces of track from various manufacturers. I downloaded the demo and tried it out and liked it. I even liked the way it worked with flex track. I paid the relatively small fee to activate the full features of the program and register it in my name. Layouts #2 and #3 were drawn with this program. There is one drawback about Empire Express for many of you reading this page. It is written for the Mac, not for the PC. I am lucky enough to have an i-Mac running OS - X sitting next to my PC. It doesn't have nearly as many features as the full blown CAD programs, but it met my needs very well at a price I was willing to pay.
I anticipate that my son and I will start actually laying the track for this layout in mid-July. There are too many things going on in June to keep otherwise occupied. Also, I have already shot this month's budget for the layout. When building gets underway, I will add another section the the site guide and start putting up progress reports, along with pictures as I have time. In the mean time, if you want to input your two cents about my chosen layout, things that should be / could be changed, things I haven't considered, etc., please feel free to send me an e-mail.
Back to site map
This page last updated 6/3/04