General Information
General Information
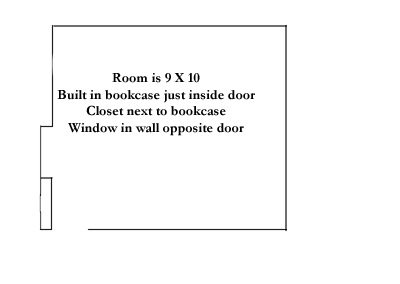
The layout is being built in a small, unused bedroom. As indicated in the diagram above, the room is 9 X 10. There is a built in bookcase just inside, and behind, the door, next to which is a closet. In the wall opposite the door is a sliding window. The window sill is about 38 inches above the floor. The window has vertical blinds, rather than curtains. I mention the blinds because construction of the table / bench work had to allow for clearance of the blinds so that they would open and close.
Electricity was not a problem with the room. There are outlets on three walls, all of which are grounded.
Lighting was a problem for the room. While there is one large window, it faces north. It does let in adequate light on bright sunny days, but otherwise, the room tended to be on the dark side. One of the outlets was on a wall switch so that a lamp could be turned on and off when entering or leaving the room. There were, however, no light fixtures on the wall or ceiling. Because a shelf layout to wrap around the room was planned, leaving the existing floor lamp was not an option.
Any changes to the lighting had to fit within the following parameters. First, the house sits on a shallow crawl space. There is room to manover to under the bedroom to work on wiring, but it is not done easily. Also, all circuit positions have been used in the breaker box, and the box is at capacity, so added a new circuit was not possible. Therefore existing curcuitry had to be used and what ever lighting scheme was decided upon could not present a possible overload situation so as to continually trip the breaker. Secondly, the room, like the rest of the house, has cathedral ceilings. There is insulation blown into the 6 inch space between the ceiling and the roof. There was no easy way to run a circuit from the light switch to a ceiling light fixture.
A couple of options were considered. The first option was to install a bright light fixture on the wall above the switched outlet. A hole could be cut into the wall to mount a junction box and wire fished down to the switched outlet and connected there, so the light fixture would opperate off of the wall switch. Likewise a plug-in type fixture could be mounted to the wall and the hanging cord could simply plug into the outlet. This would be much simpler since junciton boxes were not being added, nor was wire being fished through the wall. Both of these options were discarded because it was felt that a wall fixture would not provide adequate lighting to the far side of the room during evening opperating sessions, or on dark and dreary days.
The second option was to install track lighting around the perimeter of the room and have it tie into a junction box at the top of the wall above the switched wall socket. Several different possibilities for track lighting were considered. The obvious advantage to track lighting was that you would have lights above the layout all the way around the room. This would provide excellent illumination of the layout. There were two downsides to this track lighting scheme however. First was current draw. We felt that in order to install the number of lighting fixtures needed in the track to illuminate the entire layout would present a potential circuit overload situation. We figured that a minimum of three fixtures per room side would be needed. Each fixture was rated at 75 - 100 watts of power. Therefore you had the potential of drawing up to 1200 watts of power just for the lights. This meant a potential draw of 10 amps on a 15 amp circuit that not only fed a couple of other bedrooms, but also had to provide the power for the layout itself. (Remember, adding a new circuit to the breaker box was not an option.) The other drawback to using track lighting was the expense. Not only did you have the cost of purchasing 40 feet of track for the lights, plus the need accessories to make 90 degree turns at the corners of the room, but you also had the expense of the light fixtures for the track. Even at a discount store like Lowes, or Home Depot, the fixtures ranged from $25 to $49 each. If there had been an empty curcuit position in the breaker box, and if money had not been a factor, this would have probably been our choice. However, I have bugeted a maximum amount of money each month for this project and the lighting for the room could would have shot, if not exceeded, our funds for an entire month.
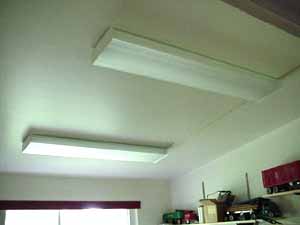
The third option was to install some sort of florescent lighting in the room. We decided that two four-foot fixtures, each using two bulbs would provide adequate lighting. Nice looking fixtures could be purchased for $49 each at Lowes. The problem remained of getting power to the fixtures. My son suggested that we use white, plastic, surface mount conduit and run from the switched plug, up the wall, and across the ceiling to the fixtures. A plug would be attached to one end of the wire so it could simply be plugged into the switched outlet. The other end would tie in directly to the light fixtures. Since the walls and ceiling were already an off-white color, the conduit, while visible, would not be objectionable. Also, since everything was surface mounted, the lighting can could easily be removed at a later date to convert the room back to a traditional bedroom with a switched table lamp or floor lamp. The conduit mounts with industrial strength double sided tape. Four screws into the ceiling studs hold each fixture. Those holes could easily be filled in with spackling compound. This was the solution that we chose. It worked well and provides a bright, white light to the room. Total cost - about $120.
|
|
|
|
|
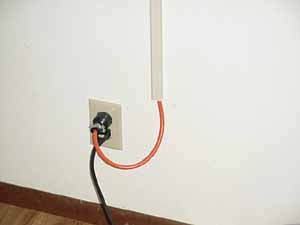
This picture shows the wire terminating into a plug at the switched outlet. This is under the benchwork and will not be seen |
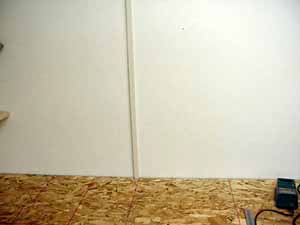
This picture, taken without a flash, shows the conduit going up the wall. Notice how the benchtop is notched to fit around it |
This shows the two florescent lights, currently off. They are connected by the surface mounted conduit that runs between them |
Flooring
 The
room was carpeted with a white berber carpeting that was relatively
old. but still in fairly good condition. At first we considered
leaving the carpeting in place and building on top of it. However,
after careful consideration, we decided that removing the carpet and
replacing it with some type of vinyl flooring had several advantages.
Obviously, cleanup from building would be much easier without
carpeting. Also, finding parts inadvertantly dropped on the floor
should be much easier. But most importantly was the fact the we
intended to have a moveable section that ran in front of the closet.
At the time the decision was made to remove the carpeting, we were
considering building a cabinet on rollers that would provide storage.
The cabinet could be rolled into position for an operating session,
then rolled out of the way to allow access to the closet when not
operating. We felt that having a hard surface would be preferable to
carpet for the moving of the cabinet and the alligning of the tracks
on the cabinet top with the rest of the layout. There is a more
information about the layout extension in the benchwork section and
the layout section.
The
room was carpeted with a white berber carpeting that was relatively
old. but still in fairly good condition. At first we considered
leaving the carpeting in place and building on top of it. However,
after careful consideration, we decided that removing the carpet and
replacing it with some type of vinyl flooring had several advantages.
Obviously, cleanup from building would be much easier without
carpeting. Also, finding parts inadvertantly dropped on the floor
should be much easier. But most importantly was the fact the we
intended to have a moveable section that ran in front of the closet.
At the time the decision was made to remove the carpeting, we were
considering building a cabinet on rollers that would provide storage.
The cabinet could be rolled into position for an operating session,
then rolled out of the way to allow access to the closet when not
operating. We felt that having a hard surface would be preferable to
carpet for the moving of the cabinet and the alligning of the tracks
on the cabinet top with the rest of the layout. There is a more
information about the layout extension in the benchwork section and
the layout section.
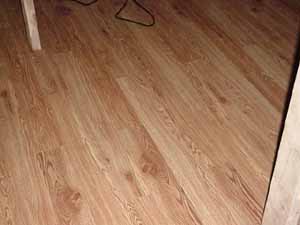
The baseboards were carefully removed and the carpet and padding ripped out. Under the carpet, we discovered a tiled linoleum floor that was in relatively good shape. (We have owned this house for a little over a year, and are still making discoveries about the construction.) We didn't want an obvious linoleum look to the train room floor however. We decided to purchase enough self-stick vinyl flooring to cover the floor in the room and the closet and simply apply this flooring to the existing linoleum tiles. The floor was given a good sweeping and scrubbing, and then the new flooring was put down. The end result was quite pleasing. Total cost was $120 for four cartons of flooring material. We had about half a box left over that can be used to replace any that get damaged.
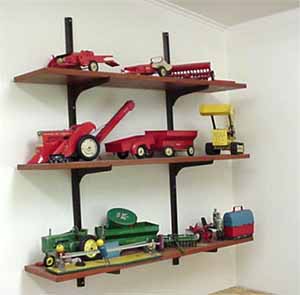
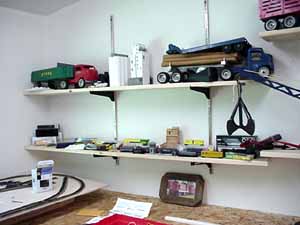
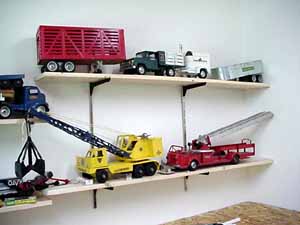
We decided not to paint the walls since they were already an off-white color. I thought a very light blue might be preferable for scenery purposes, but that can always be done later. My wife made the suggestion that we should put adjustable shelves on the wall, and display the toy trucks and farm equipment I had in the late 40's and 50's as a kid, as well as my brother-in-law's Lionel equipment from the same era. Shelves were hastily put up and boxes of trucks and tractors stored in the room were unpacked. An easy way to get the boxes out of the way. At a later date, shelves will be stained and the display made more attractive. For now the shelves offer a convenient place to place things we are working with to get them out of the way. These pictures will be updated later with more pleasing images later.
|
|
|
|
This page updated 5/30/04