Like anything else, just when you think you are beginning to know what you are doing, your interests change. When the current track plan was selected, I had limited space available, i.e. the 9 X 10 bedroom. I wanted to be able have continuous running so that I could watch the trains. I wanted to be able to have multiple trains running at the same time and not have to worry about block control. I also knew that I wanted switching opportunities to add some interest. I knew that most of the time I would be in the layout room by myself, running the layout. And so the track was laid and the layout was wired...
And then I discovered prototype operations, and learned about car cards, and waybills, and car forwarding, and switch lists. While in Florida during the winter of 2005, I got invited to ops sessions on a couple of layouts. Contacts were made and the invitations and operations opportunities continued after I returned to the north country. I joined OpSIG (Operations Special Interest Group), and started doing some limited traveling to operate on other layouts around Michigan.
I found myself re-evaluating my layout. How could I run schedules? How many operators could I keep busy at the same time?
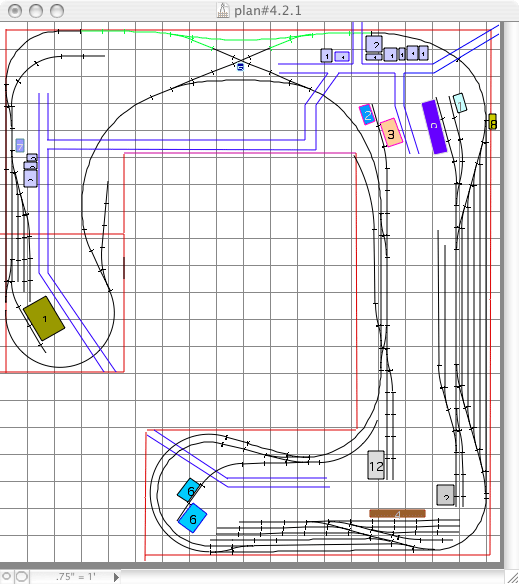
The above diagram is the current track plan, as it exists today. It represents some additions that were made as the track was actually laid. In an Ops Session, four people could kept busy at the same time. This would include 2 road crews, a yard master that moved back and forth between the two larger yards, and a switcher crew that moved between the grain facility and siding on the far left, and industrial area and interchange near the front of the bench on the right. If you add a dispatcher, then a fifth person could be kept busy. Unfortunately, even though the center of the layout room looks spacious, there is really only room for two people to operate at any given time, without getting in each other's way. Tethered throttles are fine for one person, but even with only two operating at the same time, the tethers constantly get in each other's way.
Track planning software is great, but, with a couple of exceptions, you can only view your plan from above. Scenes, or trackage, that looks adequately separated when viewing the plan in 2D, actually run together, or blend into each other, when viewed in 3D. What the plan above really needs is a 3 foot wide aisle around the outside of the layout. This would allow for view blocks, or screens, to run down the center of the bench work, separating the tracks in the foreground from the tracks closest to the walls. Adding structures to the layout has helped with this problem. Also, adding some contour and scenery items, like trees, will help even more.
When this layout was built, is was placed on a flat shelf that wrapped around the room. Track elevation did not change. Land elevation did not change. There are no gullies or streams or rivers or anything. Regardless of how you look at it, flat is boring. Yes, it is possible to go back cut out a river or stream from the plywood deck. But this is much more difficult to do once the track is laid than it would have been to do before hand. As scenery is added to the layout, gentle rises (low hills) can be added to the area between the tracks to overcome some of the problem. This will help to hide the fact that the track remains at the exact same elevation all the way around. On the plus side is the fact that there are no worrisome grades to be concerned about.
I actually did something right! I would like to be able to say that I planned it this way...
In one of the online discussion groups on track planning, someone made the statement that you should operate your layout for months before you start to add permanent scenery. This really makes sense. Here are some examples.
I have been building structure kits and placing them on the layout to see how they look. Many of the structures that I placed footprints for in the original design have ended up somewhere else. Being able to move the structures around has allowed me to experiment with different scenes in different locations, and different serviced businesses in different area. I have found that the flow of rail traffic on the layout has been greatly improved by moving some structures to different locations, and replacing others with something else.
When my son and I started construction on this layout, he designed some large, really large, control panels to handle the turnouts and provide feedback from the DCC circuit breakers as we were operating. You can see pictures of the control panels in another section of this web site. While they look nice, they are a pain in the behind. Because of the way they are mounted, they have a tendency to limit access to the back corners of the layout. They also get in the way when trying to gain access to the area underneath the layout. On the plus side, they are removeable, with quick disconnect cable connectors. If a problem develops with the wiring on a panel, it can simply be removed and placed on the bench for trouble shooting. All in all, if I had it to do over again, I would go with the small fascia panels rather than the monsters we now have.
Notice how the yards on my current plan are back at the wall, out of the way, thus leaving room for scenery in the foreground. What a mistake! Micro-Train magnetic couplers work pretty well. However, they are not 100% reliable. Either the knuckles won't uncouple, or the magnets are placed in the wrong place for the maneuver you are trying to make. In either situation, you need to either use a pick to do the uncoupling, or carefully lift one end of the car to uncouple manually. Sounds easy. Now, try reaching 2 - 3 feet to the back of the shelf and reaching over foreground structures at the same time without creating some damage. What looked great on paper, and worked fairly well on a totally unlandscaped layout, suddenly becomes a 'gotcha' on a layout that is being fleshed out with structures and scenery. At least structures have some resistance to them. Things like trees and utility poles on the other hand...
When I first started reading model railroad magazines, I was amazed at the number of authors who nonchalantly stated that they had torn their previous layout down and started over with a new scale, or era, or road, or track plan. I couldn't conceive of someone tearing down a layout that they had devoted thousands of hours of work to just to start over again. Now, after living with this layout for the past couple of years, I find myself wondering whether it is time to start over again. I suspect that everyone reaches this crossroads at one time or another. At what point is it time to admit that the current layout simply doesn't meet your needs anymore and that no matter what you do to it, it never will? Or, at what point, do you admit that your layout no longer meets your needs, but you are willing to modify your expectations and make the best of what you have? When I discover the answer, I will let the rest of you know.
My wife has decided that the room she used has her craft room no longer meets her needs. While she would like to keep it as an extra bedroom (it is actually a mother-in-law apartment with a sitting room and a half-bath attached) for when family visits, she has reluctantly agreed that if I really think it is necessary, I can move my layout there. I am suddenly faced with the possibility of expanding from a room the is 9 X 10, to an irregular shaped room that is 21 feet long and, allowing for built-ins, such as the half bath, ranges from 8 to 15 feet in width. Gee, room for a layout that would allow more than two operators at any given time, a half bath, and a crew lounge!
So now it is back to the drawing board, or the computer keyboard, to see what the possibilities are. When I came up with the track plan for my current layout, I had no idea of what I really wanted my layout to do, other than run trains. Therefore, the track plan selection was more a process of finding an existing plan that could easily be modified to fit into the existing space, than designing a plan that would meet certain predetermined criteria. The two assumptions that I did have turned out to be totally erroneous. They were:
In an attempt not to repeat the same mistake, the first thing I did was to develop a list of criteria any new track plan should meet. These criteria are:
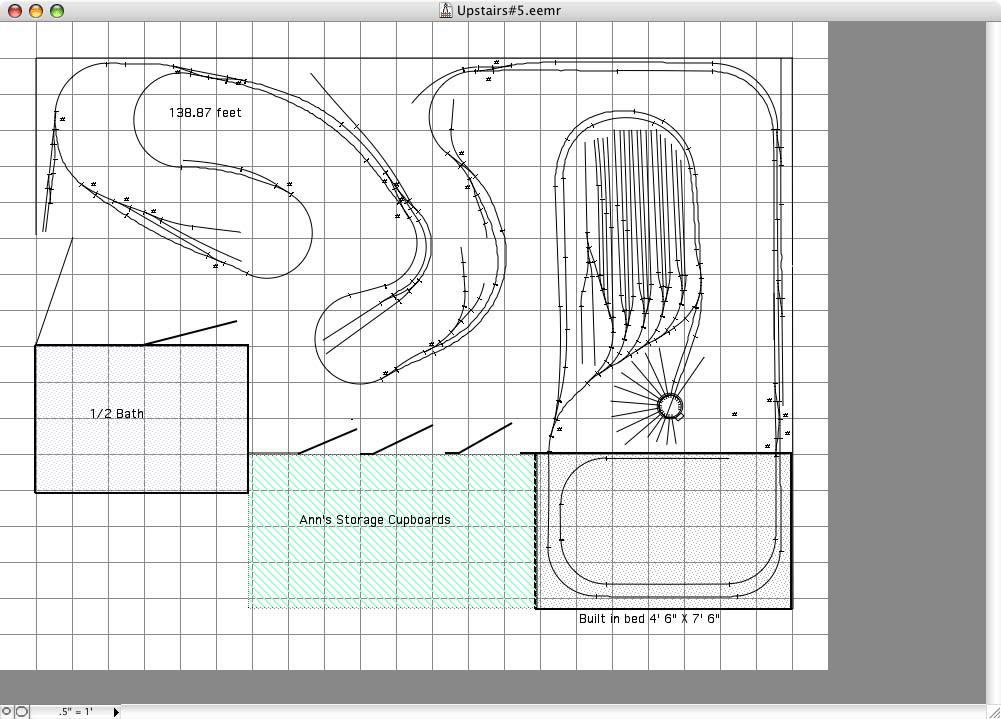
The grid lines in this plan are 1 foot square. The bench work is not shown. Allowances have to be made for the door into the room, the door to the 1/2 bath, and access to the built-in storage cupboards. The area marked built in bed will have the mattress removed. The lowest level of track would actually be a good 20 inches above the bed platform, which is a permanent structure. This is an out and back type plan with a reverse loop at each end. There are three peninsulas, with aisle space around them. You have to walk completely around the 3rd peninsula to gain access to the round house and turn table. There is the provision for the beginning of a helix in the bed area that could take you up to a complete second level. However, the second level is optional since the first level can stand completely on its own. Visible staging could be incorporated in place of the heilix. This plan provides a main line run (out and back) of about 139 feet. A second level would increase the mainline run to in excess of 275 feet, including the helix. This plan offers the large yard and engine facility I listed as an assumption. However, there are many pinch points in the aisles that would make multiple operator operation a bit difficult.
After reading all of the comments made by members of the Layout Design SIG, I revisited a track plan I had come up with earlier. At first glance, this plan is far more cluttered than the plan above.

At first glance, this also looks to be an out and back type of plan with a couple of reverse loops. In actuality, however, this plan is a multi-level oval with many wrinkle in it. The purple line that runs through the plan represents an elevation break, with the trackage behind the purple line (either towards the interior of the peninsulas or closer to the walls) being 3 to 3 1/2 inches higher than the track closest to the front of the shelves or peninsulas. The transition between the two elevations is accomplished with a 1.7% grade that sweeps around the outside of the industrial area planned for the far left-hand side of the layout. On the right-hand side of the layout in the bed area is a one turn helix with a grade of 1.5% that connects the two levels.
On the right hand side of the track plan are two green lines that appear to terminate. Actually, they both have grade of 1.5% and terminate in a staging yard that would be under the largest of the peninsulas. This gives the needed connection to the outside world with trains coming in from somewhere, running the layout, and then disappearing to go somewhere else.
On the left-hand side of the plan in the bed area is a red line that is the beginning of a multiple turn helix that would connect with a second shelf that would be at least 12 inches above the bottom shelf. The upper shelf would be relatively narrow, so as not to obstruct the view and access to the lower shelf. This is where the large classification yard and engine facility could be located.
There are a lot of other possibilities to explore yet, in addition to the two plans shown above, before the decision to hold or fold can be made. Of course, this, in itself, is part of the fun of model railroading. It costs nothing but time to continue to plan and study various options. In the mean time, I can continue working on my modest layout, hopefully improving my skills, and learning other lessons.
Negotiations for the larger room fell through. I don't have the money to add a second story to my 3 1/2 car garage. So I am back to working with the 9 X 10 bedroom that I started with. However, some progress has been made.
My son wanted to try for some elevation changes, so he cookie-cuttered one side of the layout. Suddenly, we are not in central Illinois flat-land any more. While the cookie cutter idea is a good one, it really makes no sense in this layout other than to provide some scenic variations. I couldn't see any way to salvage what I had so that I would be happy with it. I was frustrated to the point that I would go weeks without even opening the door to the layout room.
Faced with the sudden prospect of an extended stay at Mayo Clinic and the possibility (and then the reality) of a tricky open heart surgery and a projected recovery time of up to a year, I invested in a new lapop PC to replace my aging desktop 10 year old desk top, and I purchased 3rd PlanIt. This in itself was a major shift, to switch from the cad program on my iMac which I used for all of the previous layout designs.
The design of a totally new layout is now under way. I decided to ignore one of my major givens. I decided to design something that would work for me, but would be far too complicated for me to build on my own with my limited skills. I should be able to complete it in my lifetime, however. When thinking about what a new plan could look like, I kept going back to my visit to Dr. Bruce Chubb's layout a year or so ago. What impressed me most about his layout was not that he used most of his two-dimensional space in his basement, but that he utilized the third dimension also. (For those that have not seen Bruce's layout, it is multi-level with the lowest level being only 20 - 24 inches off the floor and the top level being over 70 inches off the floor.) I decided to do basically the same thing. Bruce had room to make the entire layout a giant helix with grades that you hardly notice. In a 9 X 10 room, however, a helix becomes a necessity.
The new layout will be composed of four levels. Level 1 will be 20 inches off the floor with operators seated in an office chair, and will be entirely dedicated to staging. Level 2 will be 35 inches off the floor and will be a series of rural scenes with vertical dividers running from the wall to the front to separate the scenes. Level 3 will be rural to suburban, with a multitude of industries that need to be switched. Level 4 will be urban and primarily devoted to a large classification yard, engine facilities and industrial switching. The plan will incorporate two reverse loops (level one under the the helix and level 4 over the helix) to facilitate continuous running. A train will pass through a scene only once in each direction, east or west. The helix is designed in such a way that on all four levels, east is to your right and west is to your left. Unlike my previous design, there is ample room for scenery and structures, rather than filling every available space with trackage.
Level 1 is designed. When I figure out how to export it to a .jpg file, or capture it in a screen shot, I will post it here for others to see. As mentioned earlier, this level is devoted to staging. It has the capacity to hold 5 shorter trains of no more than 13 forty-foot box cars, 5 longer freights or full passenger trains, and 3 shorter trains for a branch line. Design work is just starting on level 2.
Return to navigation page.